
 |
| Ven´Tara Class Carrier |
But first: Who the Hell are the Mairidians???
Well, the Mauridian Star Empire is a fictional Race from "Cold Navy" - a Background Universe for Sci-Fi Wargaming but without own Rules. They have some nice Fluff for the wonderfull Starships from "Ravenstar Studios"
 |
| Mauridian Banner |
Now the Facts:
I choosed a Model of a "Ven`Tara Class-Carrier" and the following Colours:

- VMC 70891 - Intermediate Green
- VMC 70995 - German Grey
- VMC 70870 - Medium Sea Grey
- VMC 70836 - London Grey
- VMC 70816 - Luftwaffe Uniform WWII
- VMC 70951 - White (not on the Picture)
- VMC 70950 - Black (not on the Picture)
- VGC 72019 - Night Blue
- VGC 72021 - Magic Blue
- VGC 72005 - Moon Yellow
- Citadel Foundation - Astronomican Grey
- Citadel Foundation - Iyanden Darksun
- Games Workshop - Dark Angels Green
- Games Workshop - Scorpion Green (not on the Picture)
- Citadel Washes - Badab Black
STEP 1:
The whole Model was primed white and got a Coat of "London Grey"

STEP 2:
After the first Layer is dried, i gave the Model a wash with "Badab Black" to give more Depth to the deeper Areas.

STEP 3:
I drybrushed the Model in 3 Steps: first a heavy Drybrush with "London Grey", then a brush with a 1:1 Mix of "London Grey" and "Medium Sea Grey", and finally a light Drybrush with pure "Medium Sea Grey" to highlight the Edges.
After That i added some shadows by using "German Grey".

STEP 4:
"Night Blue" was mixed with "Magic Blue" (Ratio 3:1) to paint the big Blue Patches of the Pattern. Note that the frontedges are irregular shaped but the rear Edges are straight!


STEP 5:
The Front edges of the Pattern now were lined with "Astronomican Grey" (first i mentioned to try White, but the Results were "too" bright and looked not harmonic)


STEP 6:
After this i added Linings by using a Mix of "Luftwaffe Uniform WWII" with "German Grey" (Ratio 3:1) at the rear edges of the Pattern.

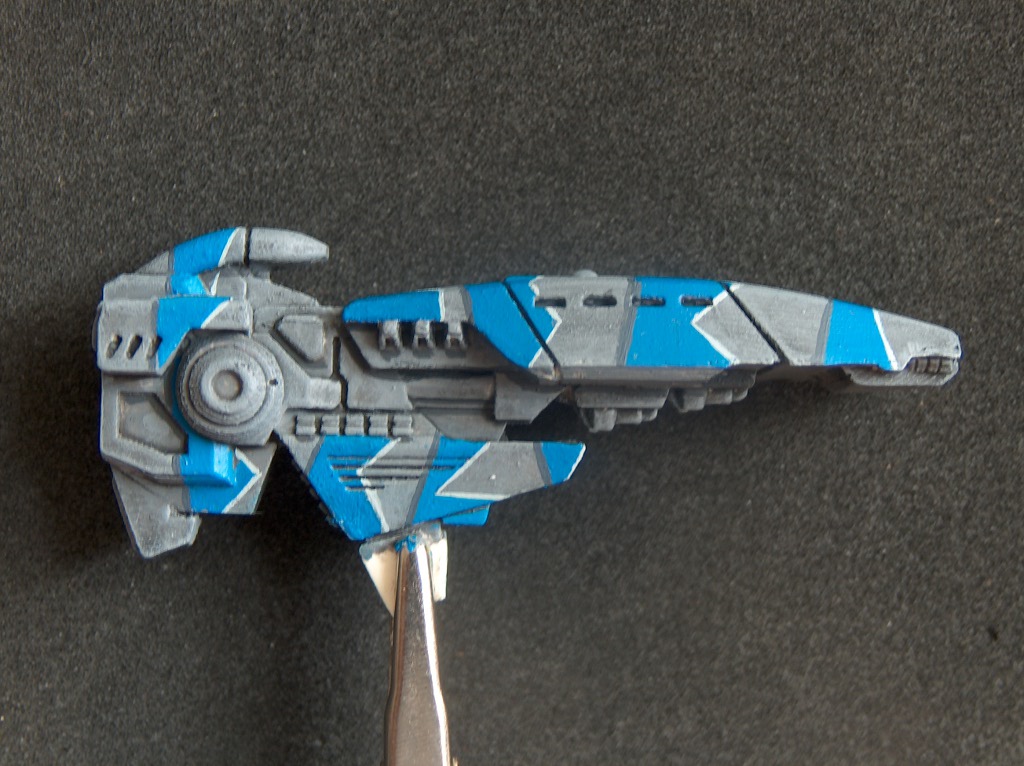
STEP 7:
Windows, Hatches , Figther hangars etc were painted in following Order:
- German Grey
- Dark Angels Green (down from 1/3 of the Area)
- Intermediate Green (down the last 2/3 of the Area)
- Scorpion Green (last Highlight at the lower Edges of the Area) if this is too dark, mix some White to the Green
- White to set a reflectionpoint to the upper left of the Area


STEP 8:
Typical Mauridian Insignias were applied by using "Iyanden Darksun" (followed by a Highlight of "Moon Yellow") on a "German Grey" Base.
After That i added some small Windows by using "Black"
Well, this is the Result so far! In the second (and last) Part of this Tutorial i show the Painting of the reamaining Part (the Part on which the bracket is sticking) , Painting of the Flightstand and the finishing Details....
Hope you like it so far.....
Looks amazing. Nice job on those small white/grey lines.
AntwortenLöschenVery good tutorial on such small model.
AntwortenLöschenGreetings
Peter
Nice tutorial !!! Very nice lokk !! Compliments
AntwortenLöschen